VJia - Software Development

Blog, Code, Life

Solr Tutorial

| Comments

The origin site is this blog: Solr Tutorial

Solr Tutorial

I recently had the need to search a large amount of online auction data. I had access to the data associated with a large number of online auctions, similar to auctions on eBay. I needed to quickly find auctions whose title and description match a given set of search terms. My solution was to use Solr, an open source search application/platform. This post describes the steps I carried out to set-up Solr, and the difficulties encountered along the way. The post covers Solr 4.6.

The decision to use Solr was based on the need for a fast and customisable mechanism to search for auctions. Initially, MySQL’s fulltext search was used. This was slow, inflexible and had a number of issues such as not recognising numbers or common words.

Overview of SOlr Operation

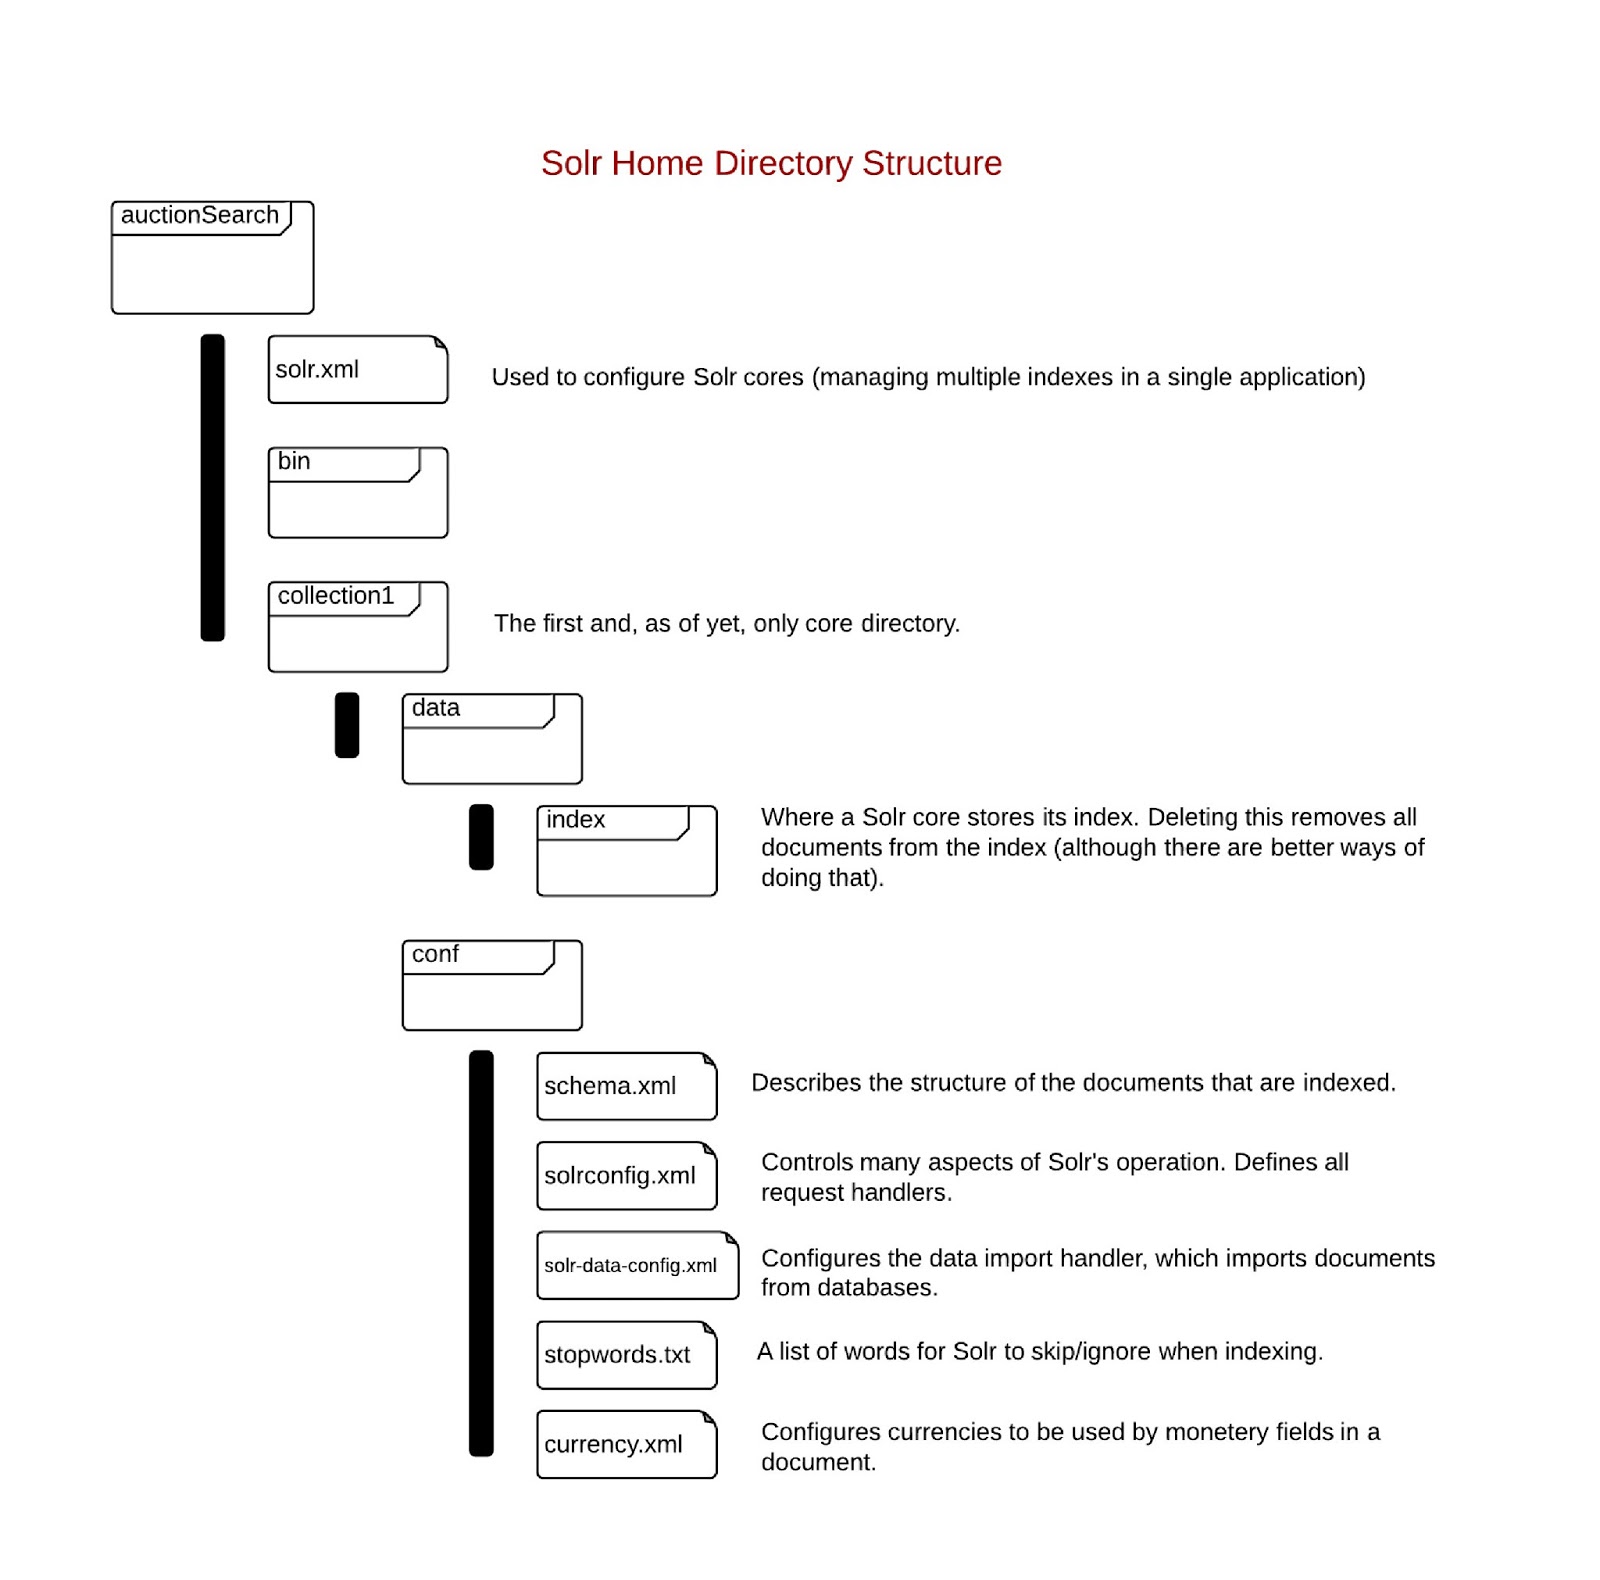
Solr behaves in many ways like a web server such as Apache: once started, Solr uses the data in its installation directory to serve responses to client requests. The major difference is that Solr is serving search results (in XML, JSON or other formats) as opposed to web pages. The Solr installation is completely standalone: the Solr directory contains everything needed to start and run the server, including a Java Servlet container and all the application data. Solr is controlled using configuration files. Four files in particular play an important role:solr.xml, solrconfig.xml, schema.xml and solr-data-config.xml [schema.xml and solr-data-config.xml can have custom names].

Starting Solr

To start Solr in its default state, navigate to:

**apache-solr-X.X.X/example/**

and run:

**java -jar start.jar **

This starts up the server and sets Solr to use the default home directory, ./solr.

When making your own Solr instance, it is a good idea to start by copying the default Solr directory, name it as you wish, and start working with this new Solr instance. Assuming I call my Solr directory AuctionSearch, to start Solr after making the new directory, run:

java -jar start.jar -Dsolr.solr.home=AuctionSearch  

After running this command, you can browse to http://localhost:8983/solr/ to view the administration user interface. The default Solr instance doesn’t have any documents indexed (or it might have just one), so there wont be much to tinker with until more documents are added. Before adding documents, however, some configuration will probably be needed.

Configuring Solr

Configuring Solr is not typically done once- instead a cycle of configuring and testing is carried out. Even months after I initially set up Solr to work for my application, I am still tweaking it as I learn more about Solr and learn more about my data. Despite this cyclic nature, the configuration of Solr will be described here in a linear fashion. However, jumping between sections is encouraged. In turn, the following will be discussed: – solr.xml Solr cores – schema.xml Document structure – solrconfig.xml Request handlers

When configuring Solr, it is helpful to have a picture of the Solr home directory structure, and to know where all the configuration files are located. The image below shows important configuration files within the example Solr directory.

Solr Home Directory Structure

SOlr Cores

A Solr core manages a single index. An index is the set of all data used to store information about documents to be searched. Each index can have only one document schema associated with it (only one document format can be stored). Using multiple cores allows a single Solr instance (single server, single administration web page) to manage multiple indexes. A use case (context: auction website) for this might be having one core for indexing auction data and another for indexing information on users. Each core will have its own core directory. Cores are configured in solr.xml. An example solr.xml:

1
2
3
4
5
6
<!-- persistent="true" allows the web interface to make lasting changes to Solr. -->
<solr persistent="true" sharedlib="lib">
<cores adminpath="/admin/cores" host="${host:}" hostcontext="${hostContext:}" hostport="${jetty.port:}" zkclienttimeout="${zkClientTimeout:15000}">
<core default="true" instancedir="auctions" name="auctions">
</core></cores>
</solr>

Usually, the default solr.xml is sufficient. You may want to change the core names and core directory names. Further details on configuring solr.xml.

In Solr 4.3 and above, solr.xml has a new purpose and a new format. In Solr 5.0 and above, the older format will not be supported.

Schema

A Solr schema describes the basic unit of information: a document. Each Solr core has a single schema, and thus, indexes only one ‘form’ of document. A document is composed of multiple fields. Each field has a type. This type is defined in the schema and specifies the underlying Java class that is created when the field is indexed. The type also specifies the text analysis (processing/digestion) that is carried out when the field is indexed. An example document and a section of the corresponding schema.xml is shown below.

1
2
3
4
5
6
7
8
9
<doc>
<field name="auction_id">54432834</field>
<field name="title">Dell M2012 24" IPS Monitor</field>
<field name="category">monitors</field>
<field name="current_bid">279.95</field>
<field name="end_date">2013-01-06T09:26:04.18Z</field>
<field name="feature">IPS</field>
<field name="feature">Swivel</field>
</doc>
1
2
3
4
5
6
7
8
9
10
11
12
13
14
15
16
17
18
19
20
21
<schema name="example" version="1.5">
<fields>
<field name="_version_" type="long" indexed="true" stored="true" required="true"/>
<field name="auction_id" type="string" indexed="true" stored="true" required="true" multiValued="false" />
<field name="title" type="text_en" indexed="true" stored="true" required="true" multiValued="false" />
<field name="category" type="string" indexed="true" stored="true" required="true" multiValued="false" />
<field name="current_bid" type="currency" indexed="true" stored="true" required="true" multiValued="false" />
<field name="end_date" type="date" indexed="true" stored="true" required="true" multiValued="false" />
<field name="feature" type="string" indexed="true" stored="true" required="false" multiValued="true" />
</fields>
<uniqueKey>auction_id</uniqueKey>
<types>
<fieldType name="string" class="solr.StrField" sortMissingLast="true" />
<fieldType name="date" class="solr.TrieDateField" precisionStep="0" positionIncrementGap="0"/>
<fieldType name="long" class="solr.TrieLongField" precisionStep="0" positionIncrementGap="0"/>
<fieldType name="text_en" class="solr.TextField" positionIncrementGap="100">
<!-- lots of details -->
</fieldType>
<fieldType name="currency" class="solr.CurrencyField" precisionStep="8" defaultCurrency="USD" currencyConfig="currency.xml" />
</types>
</schema>

The components of schema.xml will now be described.

Fields

A field describes a piece of information within a document. It controls aspects of the indexing process such as what Java type is used to represent the data, whether the data is stored, whether the field is required in every document etc. There are two types of special fields: copyField and dynamicField (not to be confused with the type parameter such as type=“string”).

copyField

Copy fields allow you to index a field in more than one way. A field is copied allowing different field types, such as text_en or string to be applied to the single piece of information.

dynamicField

Dynamic fields are, in a way, an inverse to copying fields; they allow you to process multiple fields in the same way. Their most useful feature is their ability to match document fields with pattern matching. A common usage of dynamic fields is to catch all fields in a document which should not be indexed. This is required, as when fields are indexed, all document fields must be processed, or an error is thrown.

An example of using copy and dynamic fields is show below:

1
2
3
4
5
6
7
8
9
10
11
12
<schema name="example" version="1.5">
<fields>
<field name="title" type="text_en" indexed="true" stored="true" required="true" multiValued="false" />
<field name="category" type="string" indexed="true" stored="true" required="true" multiValued="false" />
<field name="feature" type="string" indexed="true" stored="true" required="false" multiValued="true" />
<field name="allText" type="text_en" indexed="true" stored="false" required="true" multiValued="true" />
</fields>
<copyField source="title" dest="allText" />
<copyField source="category" dest="allText" />
<copyField source="feature" dest="allText" />
<dynamicField name="*" type="ignored" multiValued="true" />
</schema>

Analysers, Tokenisers and Filters

Analyser

An analyzer converts the text of a field and modifies it to form the text that is indexed. Analyzers are made up of one or more tokenizer and/or filter. Seeing as analyzers are constructed from filters and tokenizers in an adhoc manor, they don’t really have a name; they will just be identified by the fieldType where they are defined.

Tokenizer

A tokenizer breaks up a stream of text into units, called tokens. For example, the text: “Please like my blog”, might be passed through a filter to produce the 4 tokens: (Please, like, my, blog) or using another type of tokenizer: (p, l, e, a, s, e, l, i, k, e, m, y, b, l, o, g).

Filter

Filters take in tokens, transform them, and output the transformed tokens (they can modify or discard them). A example: a filter which converts all text to lowercase.

A useful note: analyzers can operate both at index time and at query time. In other words, they transform both the documents that are indexed and the search terms that are used by a user.

A reasonably complex analyzer is shown below. It is defined in the example Solr schema.xml file for the fieldType text_en:

1
2
3
4
5
6
7
8
9
10
11
12
13
14
15
16
17
18
19
20
21
22
23
24
25
26
27
<fieldType name="text_en" class="solr.TextField" positionIncrementGap="100">
<analyzer type="index">
<tokenizer class="solr.StandardTokenizerFactory"/>
<filter class="solr.StopFilterFactory"
ignoreCase="true"
words="lang/stopwords_en.txt"
enablePositionIncrements="true"
/>
<filter class="solr.LowerCaseFilterFactory"/>
<filter class="solr.EnglishPossessiveFilterFactory"/>
<filter class="solr.KeywordMarkerFilterFactory" protected="protwords.txt"/>
<filter class="solr.PorterStemFilterFactory"/>
</analyzer>
<analyzer type="query">
<tokenizer class="solr.StandardTokenizerFactory"/>
<filter class="solr.SynonymFilterFactory" synonyms="synonyms.txt" ignoreCase="true" expand="true"/>
<filter class="solr.StopFilterFactory"
ignoreCase="true"
words="lang/stopwords_en.txt"
enablePositionIncrements="true"
/>
<filter class="solr.LowerCaseFilterFactory"/>
<filter class="solr.EnglishPossessiveFilterFactory"/>
<filter class="solr.KeywordMarkerFilterFactory" protected="protwords.txt"/>
<filter class="solr.PorterStemFilterFactory"/>
</analyzer>
</fieldType>

Schema Snares

Multivalued Fields

Multivalued refers to the possibility of their being two values for present in the same document for a single field. For example, for the document shown below, there is always only one title. An example of a multivalued field is the feature field, this can have many values in a single document. What is important to realise when using multivalued fields, is that the data gets flattened. If an auction has 2 features, then the two features get flattened such that the relationship between the name and the value of the feature is lost.

1
2
3
4
5
6
7
8
9
10
11
12
13
14
15
16
17
18
19
20
21
22
23
24
25
26
27
28
<!-- What an auction might look like in its original XML form: -->
<auction>
<title>Desktop PC</title>
<feature>
<name>RAM</name>
<value>16 GB</value>
</feature>
<feature>
<name>CPU Frequency</name>
<value>4.5 GHz</value>
</feature>
</auction>

<!-- What an auction would look like as a Solr document: -->
<doc>
<field name="title">Desktop PC</field>
<field name="feature_name">RAM</field>
<field name="feature_value">16 GB</field>
<field name="feature_name">CPU Frequency</field>
<field name="feature_value">4.5 GHz</field>
</doc>

<!-- The *effect* of multivalued field flattening: -->
<doc>
<field name="title">Desktop PC</field>
<field name="feature_name">RAM CPU Frequency</field>
<field name="feature_value">16 GB 4.5 GHz</field>
</doc>

By observing the way the data is indexed, it is clear that the relationship between the name and value pairs is lost. In other words, one to many relationships cannot be maintained by Solr in a single index (the is an exotic method of using multiple indexes and multiple cores). From a relational database point of view, Solr flattens all data into a single ‘table’.

PolyFields

A ployfield, such as the Currency field, is a field that requires more than one value to be stored when it is indexed. The currency field needs to store both the amount of money and the currency of the money. Polyfields must have stored=true, or errors will result.

solrconfig.xml

solrconfig.xml is used to configure many aspects of Solr’s operation, for example, it is used to configure: – request handlers – listeners (listen for requests sent to handlers) – admin interface – replication and duplication

Typically, the only changes that need to be made to solrconfig.xml are to add or alter search and index request handlers. These two examples will be covered in the Indexing and Searching sections respectively.

Indexing Data

There are two ways I have used to add documents to an index: posting XML to a request handler or importing it from a database. All the data I index is also stored in a database. I initially carry out a data import from a database to catch up on the database from an empty state. Once this import is finished, new documents are added to the index by sending the documents in XML form to Solr via HTTP post.

Importing from a Database

Importing data from a database in carried out using the Data Import Handler (DIH). To use the DIH, a configuration file must be created to direct the conversion. In addition to the configuration file, a request handler must be specified in solrconfig.xml for the DIH. The details of writing the configuration file is given in the above link.

Posting XML

Once Solr has indexed the entire database, new documents are added by posting them to a Solr request handler. SolrJ, a Java API for Solr, is used to do the posting. Solr comes with a simple request handler for adding documents by posting XML. It is defined in solrconfig.xml as follows:

1
2
<!-- in solrconfig.xml -->
<requestHandler name="/update" class="solr.UpdateRequestHandler" />

Thus, by sending XML to the URL http://localhost:8983/solr/coreName/update, Solr will add the document to the index. Unfortunately, in most situations, if you already have XML data which you want to index, it probably wont exist in the format that Solr expects. For example, compare the following:

1
2
3
4
5
6
7
8
9
10
11
12
13
14
<!-- original XML format: -->
<auction>
<auction_id>54432834</auction_id>
<title>Dell M2012 24" IPS Monitor</title>
<category>monitors</category>
<current_bid>279.95</current_bid>
</auction>
<!-- The format Solr requires: -->
<doc>
<field name="auction_id">54432834</field>
<field name="title">Dell M2012 24" IPS Monitor</field>
<field name="category">monitors</field>
<field name="current_bid">279.95</field>
</doc>

Thus, there is a need to convert the original XML into the form which Solr expects. There are two ways to do this conversion:

  • In Java: JAXP API can be used to carry out the conversion. This will require writing custom code to do the conversion. Alternatively, if your data exists as Java classes, you can index those through SolrJ, which has a persistence mechanism allowing Java objects to be indexed directly.
  • Use XSLT: Configure the Solr request handler to transform the posted XML using a specified XSLT before trying to index the document. An XSLT file to transform an XML document (with root XML element ‘Auction’) is shown below:
1
2
3
4
5
6
7
8
9
10
11
12
13
14
15
16
17
18
19
20
21
22
23
24
25
26
27
28
29
30
31
32
33
34
35
36
37
38
39
40
<?xml version="1.0" encoding="UTF-8" ?>

<!-- the 2.0 version of xsl reqires a custom processor to be used. Saxon9he is used, and is
located in Jetty's ext/ folder. This library requires Jetty to be started like so:
java -Djavax.xml.transform.TransformerFactory=net.sf.saxon.TransformerFactoryImpl -jar start.jar
-->
<xsl:stylesheet version="2.0"
xmlns:xsl="http://www.w3.org/1999/XSL/Transform"
xmlns:xs="http://www.w3.org/2001/XMLSchema"
xmlns:fn="http://www.w3.org/2005/xpath-functions"
xmlns:xdt="http://www.w3.org/2005/xpath-datatypes"
xmlns:err="http://www.w3.org/2005/xqt-errors"
xmlns:tm="http://api.trademe.co.nz/v1"
exclude-result-prefixes="xs xdt err fn tm">

<xsl:output method="xml" indent="yes"/>

<!-- 'Auction" is the root XML element -->
<xsl:template match="tm:Auction">
<add><doc>
<xsl:for-each select="//text()/.. intersect child::*">
<field>
<xsl:attribute name="name">
<xsl:value-of select="name()"/>
</xsl:attribute>
<xsl:value-of select="."/>
</field>
</xsl:for-each>

<xsl:for-each select="//text()/.. except child::*">
<field>
<xsl:attribute name="name">
<xsl:value-of select="../name()"/>_<xsl:value-of select="name()"/>
</xsl:attribute>
<xsl:value-of select="."/>
</field>
</xsl:for-each>
</doc></add>
</xsl:template>
</xsl:stylesheet>

Indexing Snares

Letter Case in the DIH Configuration File

Table and row names in the DIH configuration file are tediously case-sensitive-ish. Some places the case doesn’t matter, and other places it does. Where it does matter, the table and row names must be in the exact same form as in the database. Also, case must be internally consistent within the configuration file for most name usages.

Missing Fields in Posted XML and DIH Mapping Everything to the Ignore Field

These two seemingly unrelated issues are linked by the presence of a dynamic field in schema.xml. When posting XML data, all fields defined in the schema file must be present in the XML file being posted. If there are fields in the XML document which are not used in the index, errors are throw when posting the XML. The way around this is to create a catch-all field: this schema field catches all fields in the document which have not been mapped to another field. This workaround, however, interferes with the operation of the DIH. The DIH, annoyingly, maps nearly all fields to the catch-all field. This may have something to do with the nice feature of the DIH which allows you to leave out every mapping from row->field if the row and field have the same name. Leaving out these mappings, however, seems to cause all fields to map to the catch-all ignore field. My current hack involves changing the schema.xml file every time I want to import documents using the DIH.

Searching

Search requests are carried out by request handlers which parse and process searches. A good way to describe search handlers is through an example. The following is a search request handler I use:

1
2
3
4
5
6
7
8
9
10
11
12
13
14
15
16
17
 <requestHandler name="/broadQuery" class="solr.SearchHandler">
<lst name="defaults">
<str name="defType">edismax</str> <!-- The search parser to use. -->
<str name="wt">xml</str> <!-- Output type. -->
<str name="fl">auction_id title</str> <!-- The fields to list in the search response -->
<str name="qf">Title^2 Feature</str> <!-- The fields (and their weightings) to search in.-->
<str name="rows">100</str> <!-- The number of results to return. -->
<str name="pf">Title^4 Feature^2</str> <!-- Phrase field (and their weightings). Fields to search for closely located matches. -->
<str name="ps">0</str> <!-- Phrase slop. How many tokens apart must words be to be able to qualify as a phrase-->
<str name="echoParams">all</str> <!-- Print the search settings in the search results. Just a handy feature -->
<str name="mm">3&lt;-1 5&lt;-2 6&lt;-40%</str>
<!-- 3>-1 5>-2 6>-40% Means: If there are 1-3 search terms, they are all required to
<!-- match. If there are 4-5 search terms, then (all - 1) must match.
If there are 5-6 search terms, then (all -2) must match
If there are >6 search terms, then (all - 40%) must match. -->
</lst>
</requestHandler>

All these parameters can be specified at query time also; defining them within the request handler definition simply specifies defaults. To use this search handler I would navigate/send request to:

http://localhost:8983/solr/auctions/broadQuery?q=dell+monitor+IPS

[Assuming that ‘auctions’ is the name of your Solr core, and Solr is hosted on localhost]

While most of the search handler’s configuration can be understood from the comments, defType, pf, ps and mm might need further explanation:

defType

defType specifies the search parser to use. There are a number of popular search parsers including Standard Search, DisMax and eDisMax. eDismax combines the features of both the Standard Search and DisMax; eDisMax supports the full query syntax of the Lucene Standard Query, but is far more tolerant of syntax errors. eDismax seems like the obvious choice in most circumstances.

pf

pf (phase fields) specifies what fields should be checked for having matching ‘phrases’. If matching terms are close enough together, then they can be considered a phrase. A result with a matching phrase will score higher than one with no matching phase. You can also specify a weighting: a field weighting will control the effect of a match on the match’s score. For example, a phrase found in the title will score higher that one found in feature.

ps

ps (phrase slop) specifies how many terms can be in-between two matching terms and still allow the matching terms to be considered a matching phrase.

Searching from Java

Searching can be carried out from Java with the use of SolrJ. The gist below shows a very simple method utilizing SolrJ:

1
2
3
4
5
6
7
8
9
10
11
12
13
14
15
16
17
18
19
20
21
22
23
public class SimpleSolrSearch {
private String solrUrl = "http://192.168.1.103:8983/solr/auctions";
private SolrServer server;
public SimpleSolrSearch() {
server = new HttpSolrServer(solrUrl);
}
public Collection<Integer> search(String searchTerms, String category, BigDecimal maxBidAmount) throws SolrServerException {
SolrQuery query = new SolrQuery();
String categoryFilter = "category:\"" + category + "\"";
query.addFilterQuery(categoryFilter);
query.addFilterQuery("current_bid:[1 TO " + maxBidAmount.doubleValue() + "]");
query.setQuery(searchTerms);

QueryResponse response = server.query(query);
SolrDocumentList documentList = response.getResults();
List<Integer> auctionIds = new ArrayList<>();
for(SolrDocument doc : documentList) {
int listingId = Integer.parseInt((String)doc.getFirstValue("auction_id"));
auctionIds.add(listingId);
}
return auctionIds;
}
}

Further Reading

I have briefly covered many common tasked carried out when using Solr. There are many more features: search faceting, search clustering, distributed searches and index replication to name a few. There are many comprehensive sources available. Some useful sources I would suggest:


Over.

The blog’s source is : http://kevindoran1.blogspot.com/2013/02/solr-tutorial.html

OCTOPress增加Disqus评论

| Comments

OCTOPress增加Disqus评论

今日步骤:

1-使用WinSCP链接UbuntuSolr image,传输已更新数据。

传输之后

1.1-更新blog页面

788  rake generate
789  rake deploy

1.2-checkin、push更改到source分支

  792  cd source/  
  798  git add .
  799  git commit -m 'new entry'
  800* git commit -a
  801  git commit -m 'new entry'
  803  git push origin source

2-添加Disqus功能

非常简单,在文件_config.yml中,修改Disqus short name:

disqus_short_name: vjgithubblog #注意这里中间一定有一个空格
disqus_show_comment_count: false

这里的disqus short name可以在这里申请。

3-同時Octopress還提供了很多第三方插件,很容易配置並支持

These third party integrations are already set up for you. Simply fill in the configurations and they’ll be added to your site.

Github - List your github repositories in the sidebar
Twitter - Add a button for sharing of posts and pages on Twitter
Google Plus One - Setup sharing for posts and pages on Google's plus one network.
Pinboard - Share your recent Pinboard bookmarks in the sidebar.
Delicious - Share your recent Delicious bookmarks in the sidebar.
Disqus Comments - Add your disqus short name to enable disqus comments on your site.
Google Analytics - Add your tracking id to enable Google Analytics tracking for your site.
Facebook - Add a Facebook like button

4-添加了Github repository显示:

github_user: yourGithubName

github_show_profile_link: true

5-添加了googlePlus链接:

googleplus_user: 11509823689222118830 #这里的数字是点击自己的Google Plus Profile时显示的一串数字,不是GMail账户名。

[转载]为什么要写Blog?

| Comments

为什么要写Blog?

来自:阮一峰的博客

日期:2006年12月22日

到今年12月为止,我写Blog已经满3年了,一共写了接近600篇,平均每2天写一篇。今后应该还会继续写下去。

3年前,我开始写的时候,并没有想过自己会坚持这么久。3年中,也遇见过几次有人问我”为什么要写Blog?”

是啊,为什么要写Blog?毕竟这里没有人支付稿酬,也看不出有任何明显的物质性收益。

Darren Rowse在他的Blog上,讲到了7个理由,我觉得说得很好。

1. 学会写作Blog的技巧(teach you the skills of blogging)

没有人天生会写Blog,我刚开始的时候也不知道该怎么写。但是,经过不断的尝试,现在我知道怎么可以写出受欢迎的文章。

2. 熟悉Blog工具(familiarize you with the tools of blogging)

写作Blog,可以选择自己搭建平台,也可以选择网上的免费Blog提供商。我曾经试用过不少Blog软件,最后才选择了现在的Moveable Type,这本身也是一个学习过程。

3. 便于更好地安排时间(help you work out how much time you have)

写作Blog花费的时间,要比大家想象的多,甚至也比我自己想象的多。但是,另一方面,每天我们又有很多时间被无谓地浪费了。坚持写作Blog的过程,也是进行更好的时间安排的过程。

4. 便于你了解自己是否可以长期做一件喜欢的事情(help you work out if you can sustain blogging for the long term)

很多人都有自己的爱好,但是只有当你享受到这种爱好时,你才会长期坚持下去。写作Blog可以帮助你体验到这种感觉。

5. 便于体验Blog文化(give you a taste of blogging ‘culture’)

Blog的世界有一种无形的礼仪、风格和用语。熟悉它们,会使你更好地表达自己和理解他人。

6. 便于你形成和了解自我(help you define a niche)

长期写作Blog最大的好处之一就是,写着写着,你的自我会变得越来越清晰。你最终会明白自己是一个什么样的人,以及自己热爱的又是什么东西。

7. 帮助你找到读者(help you find a readership)

与他人交流是生命最大的乐趣之一。写作Blog可以帮助我们更好地做到这一点。

如果你觉得你想说的东西不适宜让他人知道,你可以在自己的电脑里写,不用放到网上。这样除了上面第7点以外,其他6点的好处也还是适用的。

总之,正是因为以上7个理由,所以我强烈建议,每一个朋友都应该有一个自己的Blog,尝试将自己的生活和想法记录下来,留下一些印记。

(完)

正则表达式

| Comments

^cell\d :

^[1-9]\d+$

^:表示匹配起始位置

\d+: 0-9的数字,个数为任意个

$: 匹配末尾

. : any character

[abc] : any of the characters a,b,or c (same as a|b|c)

[abc[hij]]: any of a,b,c,h,j,j (same as a|b|c|h|i|j) (union)

[a-z&&[hij]]: either h,I, or j (insersection)

\s : a whitespace character (space, tab, newline, form feed, carriage return)

\S : a non-whitespace character ([^\s])

\d : a numberic digit [0-9]

\D : a non-digit [0-9]

\w : a word character [a-zA-Z_0-9]

\W : a non-word chacter [^\w]

正则表达式的百度百科详细解释link

TiddlyWiki简介

| Comments

之前cxc曾经问过我,有没有比较好的wiki展示页面或系统,能够脱离Server运行,而且内容组织良好。

当时是基于JS实现了一个单页面,但是其内容编辑的话,还是要在源代码中编辑,比如加入新段落-BR,或-P tag,个人感觉很马虎,不满意。

现在发现一个比较不错的wiki单页面系统,可用性、易用性都很好-TiddlyWiki.

具体使用方法可以参考官网,现在最新版是Release 5.0.10-beta.

A Good Refcardz of Core Java on DZone

| Comments

Core Java

The Essential Java Cheat Sheet

The Core Java Technology is the foundation of Java Platform of JSE. It is utilized in all classes of Java programming, from desktop to Java Enterprise Edition. This DZone Refcard gives you an overview of key aspects of the Java language and cheat sheets on the core library (formatted output, collections, regular expressions, logging, properties) as well as the most commonly used tools (javac, java, jar). In addition, this Refcard reviews Java Keywords, Standard Java Packages, Character Escape Sequences, Collections and Common Algorithms, Regular Expressions, JAR Files and more.

The hyperlink.

读写Blob对象-Oracle版

| Comments

在JDBC中如何Insert/Retrieve BLOB对象呢?

示例代码如下:

1
2
3
4
5
6
7
8
9
10
11
12
13
14
15
16
17
18
19
20
21
22
23
24
25
26
27
28
29
30
31
32
33
34
35
36
37
38
39
40
41
42
43
44
45

  private static void testWriteReadObjectInBlob() {
      try {
          // table blob_test : create table blob_test(id number, test blob);
          System.out.println("@testWriteReadObjectInBlob:");
          conn.setAutoCommit(false);
          Statement stmt = conn.createStatement();
          String id = "" + 6;
          System.out.println("current id : " + id);
          String sql1 = "insert into blob_test(id, test) values ([id], empty_blob())".replace("[id]", id);
          stmt.executeUpdate(sql1);
          String sql2 = "select test from blob_test where id=[id] for update".replace("[id]", id);
          ResultSet rs = stmt.executeQuery(sql2);
          Object master = any_of_my_class_object;//TODO
          ByteArrayOutputStream bos = new ByteArrayOutputStream();
          ObjectOutputStream oos = new ObjectOutputStream(bos);
          oos.writeObject(master);
          byte[] data = bos.toByteArray();
          while(rs.next()) {
              oracle.sql.BLOB blob = (oracle.sql.BLOB)rs.getBlob("test");
              OutputStream outStream = blob.getBinaryOutputStream();
              outStream.write(data, 0, data.length);
              outStream.flush();
              outStream.close();
          }
          conn.commit();
          
          //read out
          String sql3 = "select * from blob_test where id=[id]".replace("[id]", id);
          rs = stmt.executeQuery(sql3);
          while(rs.next()) {
              byte[] byteBuffer = rs.getBytes("test");
              ByteArrayInputStream byteArrayInputStream = new ByteArrayInputStream(byteBuffer);
              ObjectInputStream objectInputStream = new ObjectInputStream(byteArrayInputStream);
              Object obj = objectInputStream.readObject();
              System.out.println("--------------------");
              System.out.println(obj);
              System.out.println("--------------------");
              System.out.println(obj.getClass().getName());
          }
          
      } catch (Exception e) {
          e.printStackTrace();
      }   
  }

参考链接:

  1. Inserting BLOB data through JDBC link;
  2. I get good answer in this SOF post link;
  3. 洛显臃肿的多种BLOB读值方式:Store Precedure、DBMS_LOB、Oracle Blob:link
  4. Reading a blob from MySQL link;

另note:

  1. Oracle中blob类型为blob;
  2. SqlServer中blob类型为image。

Class.getName() 的返回值说明

| Comments

refer url: link

Examples:

 String.class.getName()
     returns "java.lang.String"
 byte.class.getName()
     returns "byte"
 (new Object[3]).getClass().getName()
     returns "[Ljava.lang.Object;"
 (new int[3][4][5][6][7][8][9]).getClass().getName()
     returns "[[[[[[[I"

在我的代码中出现如下信息:

obj : [B@34be51e8
classname : [B

a single [ means an array of

L followed by a fully qualified class name (e.g. java/lang/Object) is the class name terminated by semicolon ;

so [Ljava.lang.object; means Object[]

class [B

class [Lcom.sun.mail.imap.IMAPMessage;

class [C

class [I

class [Ljava.lang.Object;

[B is array of primitive byte

[C is array of primitive char

[I is array of primitive int

[Lx is array of type x

Here is the entire list: link on SOF

B - byte
C - char
D - double
F - float
I - int
J - long
Lfully-qualified-class; - between an L and a ; is the full class name, using / as the delimiter between packages (for example, Ljava/lang/String;)
S - short
Z - boolean
[ - one [ for every dimension of the array
(argument types)return-type - method signature, such as (I)V, with the additional pseudo-type of V for void method

SCP命令的使用

| Comments

复制文件

SCP命令用于在Linux间拷贝文件,(可以在拷贝过程中重命名)

scp [可选参数] file_source file_target

从本地复制到远程:

scp local_file remote_username@remote_ip:remote_folder

scp local_file remote_username@remote_ip:remote_folder

scp local_file remote_ip:remote_folder

scp local_file remote_ip:remote_file

用法示例:

user1 in centos, user2 in ubuntu

copy file1 from centos to ubuntu

1
2
$scp /home/user1/downloads/file1 user2@ubuntu_ip:/home/user2/
type in the password of user2

复制目录

scp -r local_folder remote_username@remote_ip:remote_folder

从远程复制到本地

scp remote_user@remote_ip:remote_file locale_file_path

scp -r remote_user@remote_ip:remote_folder locale_folder_path